最終更新日:2020.08.26
目次ってあると便利ですよね!
今回はWordPress(ワードプレス)でプラグインを使わず目次を追加・表示する方法を紹介します。
投稿画面で表示非表示も切り替える事ができますよ(^o^)
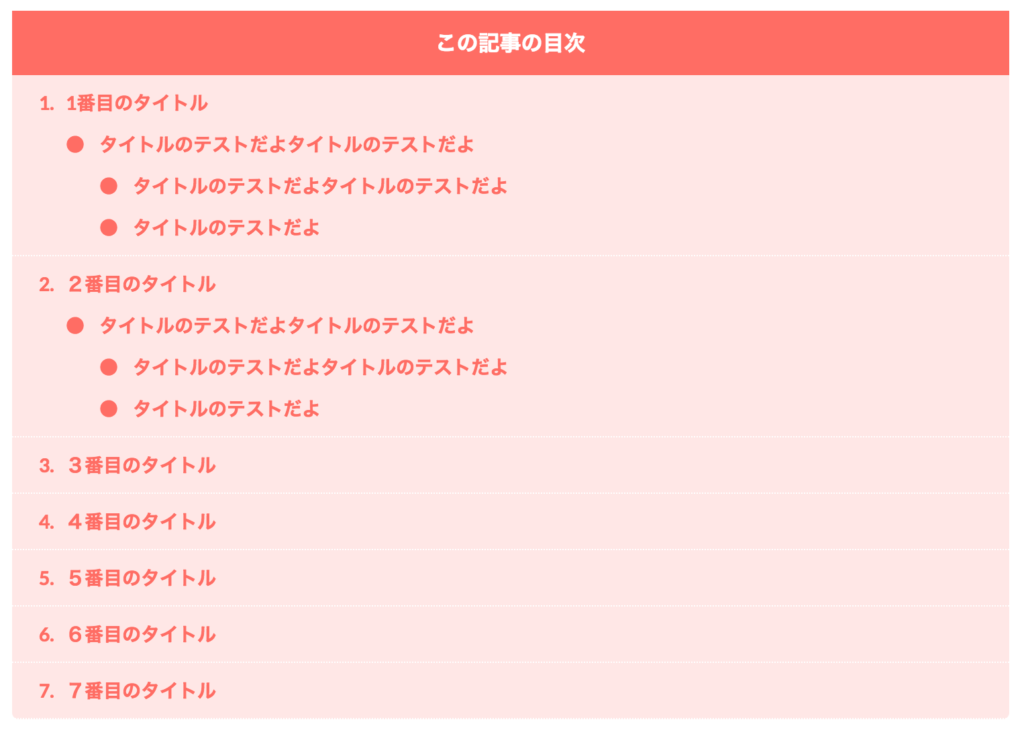
完成図


2ステップで完了します
function.phpとstyle.cssに以下のコードを追加するだけです!

1分で完成するよ!
function.php
投稿画面にチェックボックスを追加する

投稿画面の右カラムにチェックがある場合は目次を表示させないカスタムフィールドを追加します。
チェックが無い場合は表示されます(^o^)
コピー
//////////////////////////////////////////////////
//目次タグ自動挿入
//////////////////////////////////////////////////

// カスタムフィールドの追加

function add_custom_field() {
	add_meta_box( 'custom-auto_table_of_contents', '目次表示', 'create_auto_table_of_contents', 'post', 'side' );
}


function create_auto_table_of_contents() {
	$keyname = 'auto_table_of_contents';
	global $post;
	// 保存されているカスタムフィールドの値を取得
	$get_value = get_post_meta( $post->ID, $keyname, true );

	// checkboxの値
	$data = ['しない'];

	// nonceの追加
	wp_nonce_field( 'action-' . $keyname, 'nonce-' . $keyname );

	// HTMLの出力
	foreach( $data as $d ) {
		$checked = '';
		if( $d === $get_value ) $checked = ' checked';
		echo '<label><input type="checkbox" name="' . $keyname . '" value="' . $d . '"' . $checked . '>' . $d . '</label>';
	}
}

add_action( 'admin_menu', 'add_custom_field' );

// カスタムフィールドの保存

function save_custom_field( $post_id ) {
	$custom_fields = ['auto_table_of_contents'];

	foreach( $custom_fields as $d ) {
		if ( isset( $_POST['nonce-' . $d] ) && $_POST['nonce-' . $d] ) {
			if( check_admin_referer( 'action-' . $d, 'nonce-' . $d ) ) {

				if( isset( $_POST[$d] ) && $_POST[$d] ) {
					update_post_meta( $post_id, $d, $_POST[$d] );
				} else {
					delete_post_meta( $post_id, $d, get_post_meta( $post_id, $d, true ) );
				}
			}
		}
	}
}

add_action( 'save_post', 'save_custom_field' );
目次を自動挿入する
次のコードをfunction.phpに貼り付けてください!
コピー
//////////////////////////////////////////////////
//目次自動挿入
//////////////////////////////////////////////////


function auto_table_of_contents( $content ) {
	if ( is_single() ) {
		//目次自動挿入カスタムフィールドの値を取得
		$auto_table_flag = get_post_meta(get_the_ID(), 'auto_table_of_contents', true);
		//目次自動挿入る場合
		if($auto_table_flag === "") {
		// タイトル要素を正規表現で表すパターン
		$pattern = '/<h[2-6]>(.*?)<\/h[2-6]>/i';
		// 本文の中から、すべてのタイトル要素を検索
		preg_match_all( $pattern, $content, $matches, PREG_SET_ORDER );

		// ページ内のタイトル要素が3つ以上の場合に目次を出力
		if( count( $matches ) > 3 ){
			// 目次の出力に使用する変数
			$toc = "\n".'<div class="table_of_contents">'."\n".'<p class="table_of_contents__title">この記事の目次</p>'."\n".'<ul>';
			// 目次の階層の判断に使用する変数
			$hierarchy = NULL;
			$nest = NULL;
			// ループ回数を数える変数
			$i = 0;

			// 本文内のタイトル要素を上から順番にループで処理
			foreach( $matches as $element ){
				// ループ回数を1加算
				$i++;
				// タイトル要素に指定するIDの属性値を作成
				$id = 'chapter-' . $i;
				// タイトル要素タグにIDを追加
				$chapter = preg_replace( '/<(.+?)>(.+?)<\/(.+?)>/',  '<$1 id ="' . $id . '">$2</$3>', $element[0] );
				// ページ内のタイトル要素を、IDが追加されているタイトル要素に置換
				$content = preg_replace( $pattern, $chapter, $content, 1);

				// タイトル要素の階層取得
				for ($s = 0; $s <= 4; $s++) {
					$title_counter = $s+2;
					$title = '<h';
					$title .= $title_counter;
					//今のタイトル
					if(strpos($element[0],$title) !== false){
						$level = $s;
					}
					//一個後のタイトル
					if(strpos($matches[$i][0],$title) !== false){
						$hierarchy = $s;
					}
				}

				//現在の状態を判断する条件分岐
				if($i == 0){
					$toc .= '';
				}elseif($hierarchy > $level){
					$toc .= '<ol>';
				}

				// 目次の項目で使用する要素を指定
				$title = $element[1];
				// 目次の項目を作成。※次のループで<li>の直下に<ol>タグを出力する場合ががあるので、ここでは<li>タグを閉じていません。
				if( $level == 0 ){
					$toc .= '<li class="h2title"><a href="#' . $id . '">' . $title . '</a>';
				}else {
					$toc .= '<li><a href="#' . $id . '">' . $title . '</a>';
				}

				// h2またはh3がそれぞれ連続する場合
				if( $hierarchy === $level ){
					$toc .= '</li>'."\n";
				} elseif($hierarchy < $level){
					$nest = $level - $hierarchy;
					$toc .= str_repeat('</ol>', $nest);
				}

			}

			// 目次の最後の項目をどの要素から作成したかによりタグの閉じ方を変更
			$endtag = $level-1;
			$toc .= str_repeat('</ol>'."\n", $endtag);

			$toc .= '</li></ol></ul>'."\n".'</div>'."\n";

			//作った目次を、1番目の見出しタグの直前に追加
			if (preg_match('/<h[2-6].*>/', $content, $matches, PREG_OFFSET_CAPTURE)) {
					// 最初のhタグの前に目次を追加します。
					$pos = $matches[0][1];
					$content = substr($content, 0, $pos) . $toc . substr($content, $pos);
			}
		}
	}
	return $content;
	}
}
add_filter( 'the_content', 'auto_table_of_contents' );
やってること
このコードは記事内のタイトルタグを探してリストアップし、タイトル要素が3つ以上あった場合目次を自動挿入します。
また、タイトル要素にアンカー用のIDを追加してページ内リンクを作成しています。
最後に作成した目次タグを一番最初のタイトル要素の上に追加しています。
投稿画面で表示しないを選んだ場合は非表示になります!
CSS
最後にCSSでデザインを整えましょう!
style.cssの一番最後に以下のコードをコピペしてください。
コピー
/*/////////////////////////////////////////////////
//目次装飾
/////////////////////////////////////////////////*/

.table_of_contents {
  width: 100%;
  border-radius: 5px;
  margin-top: 40px;
  padding:0 5%:
  color: #ff7d6e;
  background: #ffebe9;
}

.table_of_contents a{
color: #ff7d6e;
display: block;
width: 100%;
}

.table_of_contents a:hover{
  color: #ff0000;
  transition: 0.2s;
  text-decoration: none;
  border-bottom: #f0b200 0px solid;
}

.table_of_contents__title {
background: #ff7d6e;
text-align: center;
padding: 10px;
color: #fff;
font-weight: bold;
}

.table_of_contents ul {
	text-align:left;
  margin: 0;
  padding: 0;
  counter-reset:table_of_contents;
}

.table_of_contents ul li {
	font-size:14px;/* remが指定できないブラウザのための設定 */
	font-size:1.4rem;
	font-weight:600;
}

.table_of_contents ul li:hover{
background: #fff;
}

.table_of_contents ul li.h2title {
  border-bottom: 1px dotted #fff;
  padding:10px;
  padding-left: 40px;
}

.table_of_contents ul li.h2title:before {
counter-increment:table_of_contents;
content:counter(table_of_contents) ".";
padding-left: 20px;
color: #ff7d6e;
font-weight: bold;
}

.table_of_contents ul li ol {
	list-style-type:none;
}
.table_of_contents ul li ol li {
	position:relative;
}

.table_of_contents ul li ol li::before {
	position: absolute;
	content: '●';
  color: #ff7d6e;
	display: inline-block;
}

@media only screen and (max-width: 767px){

}
まとめ
デザインは自由に変更して使ってくださいね!
タイトルがh2以外から始まっている場合は使えないのでいつか改造したいなぁ。
↓自動化カスタマイズはこちら↓
↓簡単カスタマイズはこちら↓


